Quantcast
Channel: Develop 1 Limited Blog - Ribbon Workbench
Viewing all 31 articles
Browse latest View live

Dynamically Enable/Disable a standard ribbon button based on a form value

$
0
0

There are occations when you need to change the command of an existing ribbon button, without changing the actual button its self. In the Ribbon Xml the Command and the Button are logically separated so that the Command can be used on more than one button.

The Ribbon Workbench for CRM 2011 allows you to easily select a standard button and 'Customise Command'. This creates a copy of the standard command along with enable/display rules for you to modify.

The following video shows the Run Workflow command being enabled/disabled based on a value on the form. Javascript is used to make a call to refreshRibbon when the form value changes. The tutorial assumes you have already installed the Ribbon Workbench as shown by this short video.


The resulting RibbonXml is:

<RibbonDiffXml xmlns:xsi="http://www.w3.org/2001/XMLSchema-instance" xmlns:xsd="http://www.w3.org/2001/XMLSchema"><CustomActions /><Templates><RibbonTemplates Id="Mscrm.Templates" /></Templates><CommandDefinitions><CommandDefinition Id="Mscrm.RunWorkflowPrimary"><EnableRules><EnableRule Id="Mscrm.FormStateNotNew" /><EnableRule Id="Mscrm.RunWorkflowPrimary" /><EnableRule Id="new.contact.FirstnameNotEmpty.EnableRule" /></EnableRules><DisplayRules /><Actions><JavaScriptFunction FunctionName="Mscrm.FormAction.launchOnDemandWorkflowForm" Library="/_static/_forms/form.js"><CrmParameter Value="PrimaryEntityTypeCode" /><StringParameter Value="" /></JavaScriptFunction></Actions></CommandDefinition></CommandDefinitions><RuleDefinitions><TabDisplayRules /><DisplayRules /><EnableRules><EnableRule Id="Mscrm.FormStateNotNew"><FormStateRule State="Create" InvertResult="true" /></EnableRule><EnableRule Id="Mscrm.RunWorkflowPrimary"><CustomRule FunctionName="Mscrm.RibbonActions.enableWorkflowOnForm" Library="/_static/_common/scripts/RibbonActions.js" /></EnableRule><EnableRule Id="new.contact.FirstnameNotEmpty.EnableRule"><ValueRule Field="firstname" Value="null" InvertResult="true" /></EnableRule></EnableRules></RuleDefinitions><LocLabels /></RibbonDiffXml>


And the refresh ribbon javascript 

function refreshRibbonOnChange()
{
    Xrm.Page.ui.refreshRibbon();
}


I hope you agree that using the Ribbon Workbench can shave hours off of your development time when customising the CRM2011 Ribbon!

The Ribbon Workbench for CRM 2011 is a free download.

If you find an issue with the Ribbon Workbench for Dynamics CRM 2011 or have any suggestions, please send it here

Happy Ribbon Customising!


Re-arrange standard Ribbon Buttons by customising Ribbon Group

$
0
0

Ribbon Groups are sets of Ribbon controls that change their layout to fit the available window width. Buttons will change size and position as defined by the template and scale settings. If you need to move buttons around within a stanard group so that the buttons used most often are always visible, you must customise the whole group rather than just the individual buttons.

The Ribbon Workbench for CRM 2011 makes customising groups simple. The following video shows you how to:

1. Customise a Group
2. Move buttons around in the group
3. Move buttons between template locations
4. Add a menu item to an existing split button in the group

The tutorial assumes you have already installed the Ribbon Workbench as shown by this short video.

The resulting RibbonXml is:


<?xml version="1.0" encoding="utf-16"?><RibbonDiffXml xmlns:xsi="http://www.w3.org/2001/XMLSchema-instance" xmlns:xsd="http://www.w3.org/2001/XMLSchema"><CustomActions><CustomAction Id="demo.Mscrm.HomepageGrid.contact.MainTab.Management.CustomAction" Location="Mscrm.HomepageGrid.contact.MainTab.Groups._children" Sequence="10"><CommandUIDefinition><Group Command="Mscrm.Enabled" Description="$Resources:Ribbon.HomepageGrid.MainTab.Management" Id="Mscrm.HomepageGrid.contact.MainTab.Management" Image32by32Popup="/_imgs/ribbon/newrecord32.png" Sequence="10" Template="Mscrm.Templates.FourOverflow" Title="$Resources:Ribbon.HomepageGrid.MainTab.Management"><Controls Id="Mscrm.HomepageGrid.contact.MainTab.Management.Controls"><Button Alt="$Resources:Ribbon.HomepageGrid.account.Record.Merge.MergeRecords" Command="Mscrm.HomepageGrid.contact.MergeRecords" Id="Mscrm.HomepageGrid.contact.MergeRecords" Image32by32="/_imgs/ribbon/MergeRecords_32.png" Image16by16="/_imgs/ribbon/MergeRecords_16.png" LabelText="$Resources:Ribbon.HomepageGrid.account.Record.Merge.MergeRecords" Sequence="10" TemplateAlias="isv" ToolTipTitle="$Resources:Ribbon.HomepageGrid.account.Record.Merge.MergeRecords" ToolTipDescription="$Resources:Ribbon.Tooltip.Merge" /><SplitButton Alt="$Resources:Ribbon.HomepageGrid.MainTab.Management.Delete" Command="Mscrm.HomepageGrid.DeleteSplitButtonCommand" Id="Mscrm.HomepageGrid.contact.DeleteMenu" Image32by32="/_imgs/Workplace/remove_32.png" Image16by16="/_imgs/ribbon/delete16.png" LabelText="$Resources:Ribbon.HomepageGrid.MainTab.Management.Delete" Sequence="15" TemplateAlias="o2" ToolTipTitle="$Resources:Mscrm_HomepageGrid_Other_MainTab_Management_Delete_ToolTipTitle" ToolTipDescription="$Resources(EntityPluralDisplayName):Ribbon.Tooltip.Delete"><Menu Id="Mscrm.HomepageGrid.contact.DeleteMenu.Menu"><MenuSection Id="Mscrm.HomepageGrid.contact.DeleteMenu.MenuSection" Sequence="10" DisplayMode="Menu16"><Controls Id="Mscrm.HomepageGrid.contact.DeleteMenu.Controls"><Button Command="demo.contact.DeleteSomething.Command" Id="demo.contact.Button1.Button" Image16by16="$webresource:new_Image16.png" LabelText="$LocLabels:demo.contact.Button1.Button.LabelText" Sequence="30" /><Button Alt="$Resources:Ribbon.HomepageGrid.MainTab.Management.Delete" Command="Mscrm.DeleteSelectedRecord" Id="Mscrm.HomepageGrid.contact.Delete" Image32by32="/_imgs/Workplace/remove_32.png" Image16by16="/_imgs/ribbon/delete16.png" LabelText="$Resources:Ribbon.HomepageGrid.MainTab.Management.Delete" Sequence="50" ToolTipTitle="$Resources:Mscrm_HomepageGrid_Other_MainTab_Management_Delete_ToolTipTitle" ToolTipDescription="$Resources(EntityPluralDisplayName):Ribbon.Tooltip.Delete" /><Button Command="Mscrm.HomepageGrid.BulkDelete" Id="Mscrm.HomepageGrid.contact.BulkDelete" Image32by32="/_imgs/ribbon/BulkDeleteWizard_32.png" Image16by16="/_imgs/ribbon/BulkDeleteWizard_16.png" LabelText="$Resources:Ribbon.HomepageGrid.MainTab.Management.BulkDelete" Sequence="100" ToolTipTitle="$Resources:Ribbon.HomepageGrid.MainTab.Management.BulkDelete" ToolTipDescription="$Resources:Ribbon.HomepageGrid.MainTab.Management.BulkDelete.TooltipDescription" /></Controls></MenuSection></Menu></SplitButton><Button Alt="$Resources:Ribbon.HomepageGrid.MainTab.Management.Edit" Command="Mscrm.EditSelectedRecord" Id="Mscrm.HomepageGrid.contact.Edit" Image32by32="/_imgs/ribbon/edit32.png" Image16by16="/_imgs/ribbon/Edit_16.png" LabelText="$Resources:Ribbon.HomepageGrid.MainTab.Management.Edit" Sequence="20" TemplateAlias="o1" ToolTipTitle="$Resources:Ribbon.HomepageGrid.MainTab.Management.Edit" ToolTipDescription="$Resources(EntityDisplayName):Ribbon.Tooltip.Edit" /><Button Alt="$Resources:Ribbon.HomepageGrid.MainTab.New" Command="Mscrm.NewRecordFromGrid" Id="Mscrm.HomepageGrid.contact.NewRecord" Image32by32="/_imgs/ribbon/newrecord32.png" Image16by16="/_imgs/ribbon/NewRecord_16.png" LabelText="$Resources:Ribbon.HomepageGrid.MainTab.New" Sequence="30" TemplateAlias="o1" ToolTipTitle="$Resources:Ribbon.HomepageGrid.MainTab.New" ToolTipDescription="$Resources(EntityDisplayName):Ribbon.Tooltip.New" /><Button Alt="$Resources:Ribbon.HomepageGrid.account.Record.Status.Deactivate" Command="Mscrm.HomepageGrid.Deactivate" Id="Mscrm.HomepageGrid.contact.Deactivate" Image32by32="/_imgs/ribbon/Deactivate_32.png" Image16by16="/_imgs/ribbon/deactivate16.png" LabelText="$Resources:Ribbon.HomepageGrid.account.Record.Status.Deactivate" Sequence="40" TemplateAlias="o2" ToolTipTitle="$Resources:Ribbon.HomepageGrid.account.Record.Status.Deactivate" ToolTipDescription="$Resources(EntityPluralDisplayName):Ribbon.Tooltip.Deactivate" /><Button Alt="$Resources:Ribbon.HomepageGrid.account.Record.Status.Activate" Command="Mscrm.HomepageGrid.Activate" Id="Mscrm.HomepageGrid.contact.Activate" Image32by32="/_imgs/ribbon/Activate_32.png" Image16by16="/_imgs/ribbon/Activate_16.png" LabelText="$Resources:Ribbon.HomepageGrid.account.Record.Status.Activate" Sequence="50" TemplateAlias="o2" ToolTipTitle="$Resources:Ribbon.HomepageGrid.account.Record.Status.Activate" ToolTipDescription="$Resources(EntityPluralDisplayName):Ribbon.Tooltip.Activate" /><FlyoutAnchor Alt="$Resources:Ribbon.HomepageGrid.account.Record.Dupe.Detect" Command="Mscrm.HomepageGrid.DetectDupes" Id="Mscrm.HomepageGrid.contact.Detect" Image16by16="/_imgs/ribbon/DetectDuplicates_16.png" Image32by32="/_imgs/ribbon/DuplicateDetection_32.png" LabelText="$Resources:Ribbon.HomepageGrid.account.Record.Dupe.Detect" Sequence="60" TemplateAlias="o3" ToolTipTitle="$Resources:Ribbon.HomepageGrid.account.Record.Dupe.Detect" ToolTipDescription="$Resources(EntityPluralDisplayName):Ribbon.Tooltip.DetectDuplicates"><Menu Id="Mscrm.HomepageGrid.contact.Detect.Menu"><MenuSection Id="Mscrm.HomepageGrid.contact.Detect.MenuSection" Sequence="10" DisplayMode="Menu16"><Controls Id="Mscrm.HomepageGrid.contact.Detect.Controls"><Button Alt="$Resources:Ribbon.HomepageGrid.account.Record.Dupe.Detect.Selected" Command="Mscrm.HomepageGrid.DetectDupesSelected" Id="Mscrm.HomepageGrid.contact.Detect.Selected" Image32by32="/_imgs/ribbon/DeleteSelected_32.png" Image16by16="/_imgs/ribbon/DeleteSelected_16.png" LabelText="$Resources:Ribbon.HomepageGrid.account.Record.Dupe.Detect.Selected" Sequence="10" ToolTipTitle="$Resources:Mscrm_HomepageGrid_Other_MainTab_Management_Detect_Selected_ToolTipTitle" ToolTipDescription="$Resources:Mscrm_HomepageGrid_Other_MainTab_Management_Detect_Selected_ToolTipDescription" /><Button Alt="$Resources:Ribbon.HomepageGrid.account.Record.Dupe.Detect.All" Command="Mscrm.HomepageGrid.DetectDupesAll" Id="Mscrm.HomepageGrid.contact.Detect.All" Image32by32="/_imgs/ribbon/DetectAll_32.png" Image16by16="/_imgs/ribbon/DetectAll_16.png" LabelText="$Resources:Ribbon.HomepageGrid.account.Record.Dupe.Detect.All" Sequence="20" ToolTipTitle="$Resources:Mscrm_HomepageGrid_Other_MainTab_Management_Detect_All_ToolTipTitle" ToolTipDescription="$Resources(EntityDisplayName):Mscrm_HomepageGrid_EntityLogicalName_MainTab_Management_Detect_All_ToolTipDescription" /></Controls></MenuSection></Menu></FlyoutAnchor></Controls></Group></CommandUIDefinition></CustomAction><CustomAction Id="demo.Mscrm.HomepageGrid.contact.MainTab.Management.MaxSize.CustomAction" Location="Mscrm.HomepageGrid.contact.MainTab.Scaling._children" Sequence="10"><CommandUIDefinition><MaxSize GroupId="Mscrm.HomepageGrid.contact.MainTab.Management" Id="Mscrm.HomepageGrid.contact.MainTab.Management.MaxSize" Sequence="10" Size="LargeMediumLargeMedium" /></CommandUIDefinition></CustomAction><CustomAction Id="demo.Mscrm.HomepageGrid.contact.MainTab.Management.Scale.1.CustomAction" Location="Mscrm.HomepageGrid.contact.MainTab.Scaling._children" Sequence="130"><CommandUIDefinition><Scale GroupId="Mscrm.HomepageGrid.contact.MainTab.Management" Id="Mscrm.HomepageGrid.contact.MainTab.Management.Scale.1" Sequence="130" Size="LargeMediumLargeMedium" /></CommandUIDefinition></CustomAction><CustomAction Id="demo.Mscrm.HomepageGrid.contact.MainTab.Management.Scale.2.CustomAction" Location="Mscrm.HomepageGrid.contact.MainTab.Scaling._children" Sequence="170"><CommandUIDefinition><Scale GroupId="Mscrm.HomepageGrid.contact.MainTab.Management" Id="Mscrm.HomepageGrid.contact.MainTab.Management.Scale.2" Sequence="170" Size="Popup" /></CommandUIDefinition></CustomAction></CustomActions><Templates><RibbonTemplates Id="Mscrm.Templates" /></Templates><CommandDefinitions><CommandDefinition Id="demo.contact.DeleteSomething.Command"><EnableRules /><DisplayRules /><Actions><Url Address="about:blank" WinMode="1" /></Actions></CommandDefinition></CommandDefinitions><RuleDefinitions><TabDisplayRules /><DisplayRules /><EnableRules /></RuleDefinitions><LocLabels><LocLabel Id="demo.contact.Button1.Button.LabelText"><Titles><Title description="Delete Something" languagecode="1033" /></Titles></LocLabel></LocLabels></RibbonDiffXml>

Watch out for an upcomming tutorial on creating new tabs and changing the scaling behaviour of groups. I hope you agree that using the Ribbon Workbench can shave hours off of your development time when customising the CRM2011 Ribbon!

The Ribbon Workbench for CRM 2011 is a free download.

If you find an issue with the Ribbon Workbench for Dynamics CRM 2011 or have any suggestions, please send it here

Happy Ribbon Customising!


Add button to Sub Grid - but only when on a specific parent entity

$
0
0

The Ribbon Workbench for CRM 2011 makes it easy to add a ribbon button to SubGrid ribbons. Your new custom button will be always shown when you have selected a subgrid on a related (1:N) entity parent entity form. Of course entities can have more than one relationship and so the same SubGrid ribbon is displayed from lots of different places. An example of this is the 'Account->Contact' and 'Contact->Sub-Contact' relationships. If you click on Contacts from an Account form, you will get the same Contact SubGrid ribbon as if you click on Sub-Contacts from the Contact Form. This may be fine, but what happens if you want to show different buttons on these two ribbons? Suppose you had a function that was only needed for Contact Sub-Contacts, but not for Account-Contacts? In this situation, the FormEntityContextRule is your friend.

The following tutorial show how to make a button visible only on the Contact->Sub-Contacts SubGrid, but not the Account->Contacts ribbon. It starts by first adding a button that appears on both, then an DisplayRule is added using the FormEntityContextRule to control the visibility.


The resulting Xml would be:

<RibbonDiffXml><CustomActions><CustomAction Id="demo.contact.Button1.Button.CustomAction" Location="Mscrm.SubGrid.contact.MainTab.Management.Controls._children" Sequence="60"><CommandUIDefinition><Button Command="demo.contact.NewButton.Command" Id="demo.contact.Button1.Button" Image32by32="$webresource:new_Image32.png" Image16by16="$webresource:new_Image16.png" LabelText="$LocLabels:demo.contact.Button1.Button.LabelText" Sequence="60" TemplateAlias="o1" /></CommandUIDefinition></CustomAction></CustomActions><Templates><RibbonTemplates Id="Mscrm.Templates"></RibbonTemplates></Templates><CommandDefinitions><CommandDefinition Id="demo.contact.NewButton.Command"><EnableRules /><DisplayRules><DisplayRule Id="demo.contact.OnlyOnContactFormSubGrid.DisplayRule" /></DisplayRules><Actions><Url Address="about:blank" WinMode="1" /></Actions></CommandDefinition></CommandDefinitions><RuleDefinitions><TabDisplayRules /><DisplayRules><DisplayRule Id="demo.contact.OnlyOnContactFormSubGrid.DisplayRule"><FormEntityContextRule EntityName="contact" /></DisplayRule></DisplayRules><EnableRules /></RuleDefinitions><LocLabels><LocLabel Id="demo.contact.Button1.Button.LabelText"><Titles><Title description="SubGrid Button" languagecode="1033" /></Titles></LocLabel></LocLabels></RibbonDiffXml>


If course, you could use an OrRule to add multiple conditions to make it appear on multiple parent forms, but not all of them. This would change your rule to be:

<DisplayRule Id="demo.contact.OnlyOnContactFormSubGrid.DisplayRule"><OrRule><Or><FormEntityContextRule EntityName="contact" /></Or><Or><FormEntityContextRule EntityName="account" /></Or></OrRule></DisplayRule>

I hope you agree that using the Ribbon Workbench can shave hours off of your development time when customising the CRM2011 Ribbon!

The Ribbon Workbench for CRM 2011 is a free download.

If you find an issue with the Ribbon Workbench for Dynamics CRM 2011 or have any suggestions, please send it here

Happy Ribbon Customising!

Add Dynamic Menu to Ribbon Button

$
0
0

The  Ribbon Workbench for CRM 2011  makes it very easy to add menu items and sections, but occasionally you may need to dynamically change the menu items depending on run-time variables such as the selected record or security roles. 

The following video shows adding a Flyout Anchor menu that is populated dynamically when opened.


The tutorial performs the following steps:

  1. Adding the DynamicMenu.js WebResource to the solution. This contains two functions, one that creates the dynamic menu and another that is called when a menu item is clicked.
  2. Adding of a Flyout Anchor button to the Contact Homepage Ribbon
  3. Creating a command that is used to dynamically populate the menu items. The command has an action that calls the populateDynamicMenu function in the DynamicMenu.js WebResource. A CommandProperties CrmParameter is passed to the function which is used to set the PopulationXML property with the Menu Xml. This Menu Xml has the same format as the Ribbon Xml Menu items, so you could use the Ribbon Workbench to create a set of menu items and then copy the generated Xml to use as a template. 
  4. The command is then set as the PopulateQueryCommand for the new Flyout Anchor Button.
  5. The MenuXml returned by the PopulateQueryCommand contains references to a command that is run when the menu item is clicked, so this command is then created passing the CommandProperties again as a parameter. This time, the CommandProperties are used to determine which item was clicked by looking at the value of the ‘SourceControlId’ property.


The DynamicMenu.js Webresource is:

function populateDynamicMenu(commandProperties)
{
// Dynamically return the menu to show - this can be built at run time
commandProperties["PopulationXML"]='<Menu Id="demo.CustomReportMenu"><MenuSection Id="demo.CustomReportSection" Sequence="10"><Controls Id="demo.CustomReportControls"><Button Id="demo.CustomReportMenu.Button1" Command="demo.contact.ItemClicked.Command" Sequence="30" LabelText="Custom Report" /></Controls></MenuSection></Menu>';
}

function itemClicked(commandProperties)
{
// Determine which button was clicked in the menu
alert(commandProperties.SourceControlId+ ' clicked');
}

The generated Ribbon Xml is:

<RibbonDiffXml xmlns:xsi="http://www.w3.org/2001/XMLSchema-instance" 

xmlns:xsd="http://www.w3.org/2001/XMLSchema"><CustomActions><CustomAction Id="demo.contact.Button1.Button.CustomAction" 

Location="Mscrm.HomepageGrid.contact.MainTab.Management.Controls._children" Sequence="29"><CommandUIDefinition><FlyoutAnchor Command="Mscrm.Enabled" Id="demo.contact.Button1.Button" 

Image16by16="$webresource:new_Image16.png" Image32by32="$webresource:new_Image32.png" 

LabelText="$LocLabels:demo.contact.Button1.Button.LabelText" PopulateDynamically="true" 

PopulateQueryCommand="demo.contact.PopulateMenu.Command" Sequence="29" TemplateAlias="o3"><Menu Id="demo.contact.Button1.Button.Menu"><MenuSection Id="demo.contact.Section2.Section" Sequence="10" DisplayMode="Menu16"><Controls Id="demo.contact.Section2.Section.Controls" /></MenuSection></Menu></FlyoutAnchor></CommandUIDefinition></CustomAction></CustomActions><Templates><RibbonTemplates Id="Mscrm.Templates" /></Templates><CommandDefinitions><CommandDefinition Id="demo.contact.PopulateMenu.Command"><EnableRules /><DisplayRules /><Actions><JavaScriptFunction FunctionName="populateDynamicMenu" Library="$webresource:demo_DynamicMenu.js"><CrmParameter Value="CommandProperties" /></JavaScriptFunction></Actions></CommandDefinition><CommandDefinition Id="demo.contact.ItemClicked.Command"><EnableRules /><DisplayRules /><Actions><JavaScriptFunction FunctionName="itemClicked" Library="$webresource:demo_DynamicMenu.js"><CrmParameter Value="CommandProperties" /></JavaScriptFunction></Actions></CommandDefinition></CommandDefinitions><RuleDefinitions><TabDisplayRules /><DisplayRules /><EnableRules /></RuleDefinitions><LocLabels><LocLabel Id="demo.contact.Button1.Button.LabelText"><Titles><Title description="Dynamic Menu" languagecode="1033" /></Titles></LocLabel></LocLabels></RibbonDiffXml>

I hope you agree that using the Ribbon Workbench can shave hours off of your development time when customising the CRM2011 Ribbon!

The Ribbon Workbench for CRM 2011 is a free download.

If you find an issue with the Ribbon Workbench for Dynamics CRM 2011 or have any suggestions, please send it here

Happy Ribbon Customising!


Ribbon Scaling De-mystified

$
0
0

If you want to add a custom group or tab to a CRM2011 ribbon, you're going to need to understand the scaling mechanism. Following the SDK tutorials and other sources around the internet will give you a basic template, but it only starts to become clear when you see it in action. The Ribbon Workbench for CRM2011 allows you to define your own scaling and quickly see how your controls will behave when the window is re-sized without waiting for it to be uploaded and published first. For this reason it makes the Ribbon Workbench a great tool to use to get a better understanding of how it all works.

Ribbon Scaling is basically a way of ensuring that the user experience is as the best it can be when working with windows of different widths. In the old-days of toolbars, if you could fit all the tools into your window widths you had a simple overflow drop down where the rest would appear. This wasn't very helpful when the most commonly used tools were always on the right hand side, because you always had to use the drop down overflow. To overcome this, the ribbon allows full control over how each group changes with the available space meaning that you can make less commonly used buttons shrink, hide the label before the more important ones.

This article is an attempt to de-mystify the rather confusing description of thise mechanism in the SDK (http://msdn.microsoft.com/en-us/library/gg309453.aspx) by using the Ribbon Workbench to show:

  • Adding a custom tab to the application ribbon (Dashboard page)
  • Adding 3 custom groups
  • Defining scaling so that the groups shrink when the window is resized.
  • Changing the template for a group

Before you continue, go ahead and install the Ribbon Workbench if you haven't already.

    1. Adding a custom tab to Dashboard page

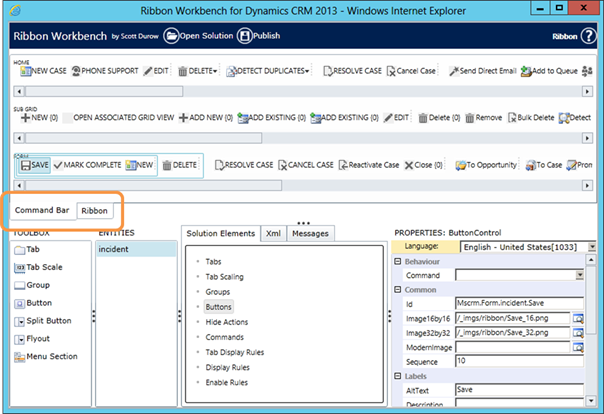
    The Ribbon Workbench uses solutions to define the ribbon customisations, so since we are adding a tab to the dashboard area, we need to create a solution and add the Application Ribbon from 'Client Extensions' as shown here:

    Now we open the ribbon workbench and select our solution. To add the custom tab, drag a new tab from the toolbox onto the application ribbon.

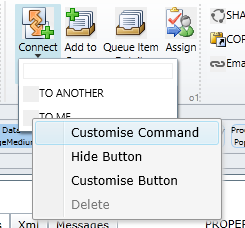
    Every tab requires a 'TabDisplayRule' to define when and where the Tab is visible. The default TabDisplayRule created by the Ribbon Workbench is defined just to show that tab on the HomePageGrid. In order to make our custom tab only visible in the dashboards area, we first delete the pre-created EntityRule, and then add a PageRule with the Address: /dashboards/dashboard.aspx. This tells the Ribbon that the tab should only be shown when the Url of the current page matches the address provided, which in our case is the dashboards area.

    So to re-cap: Delete the pre-created EntityRule:

    Add a new Rule to the Tab Display Rule:

    Finally, select 'Add Rule' and select 'PageRule'. Select the new Page Rule, and enter the Address: /dashboards/dashboard.aspx

    2. Adding three groups to the New Tab

    To really see how the Ribbon scaling behaviour works we need to make our ribbon tab big enough so that it does not fit to a window width by adding some more groups and buttons. Drag another 2 group to the tab, and then add 2 buttons to each layout section o1 and isv. I added some 16x16 and 32x32 images by including them in the solution.

    At this point I should explain what the layout sections are. Each tab is divided into groups as you know but then each group is sub-divided into layout sections. These are not visible directly to the user when viewed in Dynamics CRM, but are used to control how the tab groups scale when the window is resized. Each group is assigned a Template and this Template in turn defines layout sections and their behaviour when scaling. 

    The default template used is 'MSCRM.Template.3'. It defines two Layout Sections with the names 'o1' and 'isv'. You can see the Layout Section names in the Ribbon Workbench to the bottom-left of the dotted divider. 

    Using the Ribbon Workbench you don't really need to worry about the xml, but it sometimes help seing what the template definition xml looks like:

    <GroupTemplate Id="Mscrm.Templates.3"><Layout Title="Large"><OverflowSection Type="OneRow" TemplateAlias="o1" DisplayMode="Large" /><OverflowSection Type="OneRow" TemplateAlias="isv" DisplayMode="Large" /></Layout><Layout Title="Medium"><OverflowSection Type="ThreeRow" TemplateAlias="o1" DisplayMode="Medium" /><OverflowSection Type="ThreeRow" TemplateAlias="isv" DisplayMode="Medium" /></Layout><Layout Title="Small"><OverflowSection Type="ThreeRow" TemplateAlias="o1" DisplayMode="Small" /><OverflowSection Type="ThreeRow" TemplateAlias="isv" DisplayMode="Small" /></Layout><Layout Title="Popup" LayoutTitle="Large" /></GroupTemplate>

    You can see each Layout Section name is called it's TemplateAlias. This is where ribbon controls are positioned in each Layout Section, but setting the Buttons TemplateAlias location.

    You will notice that the same TemplateAlias appears more than once in the Template. This is because the Template also defines how the Layout Sections will change size when the Ribbon is scaled using the 'DisplayMode' property. It does this by defining different layouts that each have a 'Title'. In each Layout, the Layout Sections are listed and the Type and DisplayMode are changed. So inside the Mscrm.Template.3 you can see that the 'Large' layout has both 'o1' and 'isv' in the 'Large' mode and as 'OneRow' - this results in 32x32 buttons being shown. There is a 'Small' Layout that has 'o1' and 'isv' in 'Small' DisplayMode with a Type of 'ThreeRow' – this makes them appear as 16x16 buttons with no label text. The only difference between this and the 'Medium' Layout is that the DisplayMode is 'Medium' which shows the Label Text alongside the 16x16 button.

    The last Layout is the 'Popup' layout where all group buttons are rendered as a single popup button. Are you with me so far? If not, just take another read of the above, and examine the GroupTemplate Xml to see how it's structured. 

    3. Managing Scaling

    The important thing to understand at this stage is that at any one time each group can only assigned a single Layout from the chosen template. The Layout is selected via the Tab Scaling settings. In the ribbon workbench, the Tab Scales are shown as the items below the main ribbon button area and define the order in which the Layouts are selected as the window width is shrunk or expanded. The starting Layout is selected by taking the left most Tab Scale for each group. In fact these are special 'Max Scales' that define the Layout to use first and are shaded blue in the Ribbon Workbench. As the window width is shrunk down, every time the ribbon width is too big to fit, the next Tab Scale is picked, and the corresponding Layout is used to make the ribbon shrink in width. Each Tab Scale item shows the name of the group it applied to on top, and the Layout that is selected underneath.

    When you first drag a Tab onto the ribbon, the Ribbon Workbench creates only a Max and a Popup scale. This means that when you shrink the ribbon, it will simply start picking the 'Popup' Layout for each group in the order they are specified.

    To see this in action, select the 'Group 1 Popup' and you will see that Group 1 converts to a popup group. If then you select the 'Group2 Popup', in turn 'Group 2' 'shrinks' to a popup. By selecting the Tab Scale from left to right is simulating the user shrinking the window width.

    I added some images and published the solution to see this happening 'for real'. Here is the window using the Max Scale items:

    And now the window is shrunk so that the first Popup layout is selected.

    This is quite an extream way of scaling a ribbon, so normally we would want to change this by defining some intermediary scale steps so that we make button smaller and hide their labels to make them smaller. To do this, drag a 'Tab Scale' item from the toolbox onto the Scale portion of the ribbon between 'Group 1 Large' and 'Group 1 Popup'. Select the new item, and then in the properties, change the Size to 'Medium'. This should give you the following:

    When the user now shrinks the ribbon, it will first change Group 1 to its 'Medium' layout, and then finally to its 'Popup' layout. By adding more Tab Scales and changing their order, you have complete control over the sequence in which groups change their size.

    If you now drag another Tab Scale after the 'Group 1 Medium', select it and change the Group property dropdown to 'Group 2' and the Size property dropdown to 'Small' you will have:

    If you publish this the ribbon will scale as the window is shrunk by:
    First changing Group 1 to Medium
        then Group 2 to Small
            then Group 1 to Popup
                then Group 2 to Popup
                    and finally Group 3 to Popup.
    The great thing about the Ribbon Workbench is you can try this out by simply clicking on the Tab Scale Items from left to right to simulate the window being shrunk.

    4. Change the template

    The default Template.3 is not always going to suit. There are other templates to choose from that CRM 2011 uses in the Standard Ribbons. You can see what these templates are like and use them by clicking on a Group and changing the 'Template' property dropdown list. If you click on Group 3 and select the Template Mscrm.Templates.Flexible.4, you will see the following message.

    This message is warning you that the current Tab Scale items for the selected group have a Layout(s) selected that are not contained in the newly chosen Template. If you select Ok, then each Layout that is not found will be re-assigned to the first layout in the selected template. You will now see:

    You can see here that the new template selected contains many more Layout sections than before, and there are more Layout Sizes to choose from. If you select a Tab Scale Item for the group, and use the Size drop down you can see all of the available Layouts.

    Have a play with this by selecting the different Layout Sizes and see the effect on the buttons. 

    The resulting RibbonXml is as follows:

    <RibbonDiffXml xmlns:xsi="http://www.w3.org/2001/XMLSchema-instance" xmlns:xsd="http://www.w3.org/2001/XMLSchema"><CustomActions><CustomAction Id="demo.Homepage.applicationribbon.tab26.CustomAction" Location="Mscrm.Tabs._children" Sequence="255"><CommandUIDefinition><Tab Command="demo.Homepage.applicationribbon.tab26.DisplayRule" Id="demo.Homepage.applicationribbon.tab26" Sequence="255" Title="$LocLabels:demo.Homepage.applicationribbon.tab26.Title"><Scaling Id="demo.Homepage.applicationribbon.tab26.Scaling"><MaxSize GroupId="demo.Homepage.applicationribbon.tab26.Group0" Id="demo.Homepage.applicationribbon.tab26.MaxSize.0" Sequence="10" Size="Large" /><MaxSize GroupId="demo.Homepage.applicationribbon.tab26.Group1" Id="demo.Homepage.applicationribbon.tab26.MaxSize.2" Sequence="15" Size="Large" /><MaxSize GroupId="demo.Homepage.applicationribbon.tab26.Group2" Id="demo.Homepage.applicationribbon.tab26.MaxSize.4" Sequence="17" Size="Large" /><Scale GroupId="demo.Homepage.applicationribbon.tab26.Group0" Id="demo.Homepage.applicationribbon.tab26.Scale.6" Sequence="18" Size="Medium" /><Scale GroupId="demo.Homepage.applicationribbon.tab26.Group1" Id="demo.Homepage.applicationribbon.tab26.Scale.7" Sequence="19" Size="Small" /><Scale GroupId="demo.Homepage.applicationribbon.tab26.Group0" Id="demo.Homepage.applicationribbon.tab26.Scale.1" Sequence="20" Size="Popup" /><Scale GroupId="demo.Homepage.applicationribbon.tab26.Group1" Id="demo.Homepage.applicationribbon.tab26.Scale.3" Sequence="30" Size="Popup" /><Scale GroupId="demo.Homepage.applicationribbon.tab26.Group2" Id="demo.Homepage.applicationribbon.tab26.Scale.5" Sequence="40" Size="Popup" /></Scaling><Groups Id="demo.Homepage.applicationribbon.tab26.Groups"><Group Id="demo.Homepage.applicationribbon.tab26.Group0" Sequence="10" Template="Mscrm.Templates.3" Title="$LocLabels:demo.Homepage.applicationribbon.tab26.Group0.Title"><Controls Id="demo.Homepage.applicationribbon.tab26.Group0.Controls"><Button Id="demo.ApplicationRibbon.Button1.Button" Image32by32="$webresource:new_Image32.png" Image16by16="$webresource:new_Image16.png" LabelText="$LocLabels:demo.ApplicationRibbon.Button1.Button.LabelText" Sequence="10" TemplateAlias="o1" /><Button Id="demo.ApplicationRibbon.Button2.Button" Image32by32="$webresource:new_Image32.png" Image16by16="$webresource:new_Image16.png" LabelText="$LocLabels:demo.ApplicationRibbon.Button2.Button.LabelText" Sequence="10" TemplateAlias="isv" /><Button Id="demo.ApplicationRibbon.Button8.Button" Image32by32="$webresource:new_Image32.png" Image16by16="$webresource:new_Image16.png" LabelText="$LocLabels:demo.ApplicationRibbon.Button8.Button.LabelText" Sequence="20" TemplateAlias="o1" /><Button Id="demo.ApplicationRibbon.Button12.Button" Image32by32="$webresource:new_Image32.png" Image16by16="$webresource:new_Image16.png" LabelText="$LocLabels:demo.ApplicationRibbon.Button12.Button.LabelText" Sequence="20" TemplateAlias="isv" /></Controls></Group><Group Id="demo.Homepage.applicationribbon.tab26.Group1" Sequence="20" Template="Mscrm.Templates.3" Title="$LocLabels:demo.Homepage.applicationribbon.tab26.Group1.Title"><Controls Id="demo.Homepage.applicationribbon.tab26.Group1.Controls"><Button Id="demo.ApplicationRibbon.Button3.Button" Image32by32="$webresource:new_Image32.png" Image16by16="$webresource:new_Image16.png" LabelText="$LocLabels:demo.ApplicationRibbon.Button3.Button.LabelText" Sequence="10" TemplateAlias="o1" /><Button Id="demo.ApplicationRibbon.Button4.Button" Image32by32="$webresource:new_Image32.png" Image16by16="$webresource:new_Image16.png" LabelText="$LocLabels:demo.ApplicationRibbon.Button4.Button.LabelText" Sequence="10" TemplateAlias="isv" /><Button Id="demo.ApplicationRibbon.Button7.Button" Image32by32="$webresource:new_Image32.png" Image16by16="$webresource:new_Image16.png" LabelText="$LocLabels:demo.ApplicationRibbon.Button7.Button.LabelText" Sequence="20" TemplateAlias="o1" /><Button Id="demo.ApplicationRibbon.Button11.Button" Image32by32="$webresource:new_Image32.png" Image16by16="$webresource:new_Image16.png" LabelText="$LocLabels:demo.ApplicationRibbon.Button11.Button.LabelText" Sequence="20" TemplateAlias="isv" /></Controls></Group><Group Id="demo.Homepage.applicationribbon.tab26.Group2" Sequence="30" Template="Mscrm.Templates.3" Title="$LocLabels:demo.Homepage.applicationribbon.tab26.Group2.Title"><Controls Id="demo.Homepage.applicationribbon.tab26.Group2.Controls"><Button Id="demo.ApplicationRibbon.Button5.Button" Image32by32="$webresource:new_Image32.png" Image16by16="$webresource:new_Image16.png" LabelText="$LocLabels:demo.ApplicationRibbon.Button5.Button.LabelText" Sequence="10" TemplateAlias="o1" /><Button Id="demo.ApplicationRibbon.Button6.Button" Image32by32="$webresource:new_Image32.png" Image16by16="$webresource:new_Image16.png" LabelText="$LocLabels:demo.ApplicationRibbon.Button6.Button.LabelText" Sequence="10" TemplateAlias="isv" /><Button Id="demo.ApplicationRibbon.Button9.Button" Image32by32="$webresource:new_Image32.png" Image16by16="$webresource:new_Image16.png" LabelText="$LocLabels:demo.ApplicationRibbon.Button9.Button.LabelText" Sequence="20" TemplateAlias="o1" /><Button Id="demo.ApplicationRibbon.Button10.Button" Image32by32="$webresource:new_Image32.png" Image16by16="$webresource:new_Image16.png" LabelText="$LocLabels:demo.ApplicationRibbon.Button10.Button.LabelText" Sequence="20" TemplateAlias="isv" /></Controls></Group></Groups></Tab></CommandUIDefinition></CustomAction></CustomActions><Templates><RibbonTemplates Id="Mscrm.Templates" /></Templates><CommandDefinitions /><RuleDefinitions><TabDisplayRules><TabDisplayRule TabCommand="demo.Homepage.applicationribbon.tab26.DisplayRule"><PageRule Address="/dashboards/dashboard.aspx" /></TabDisplayRule></TabDisplayRules><DisplayRules /><EnableRules /></RuleDefinitions><LocLabels><LocLabel Id="demo.ApplicationRibbon.Button1.Button.LabelText"><Titles><Title description="1" languagecode="1033" /></Titles></LocLabel><LocLabel Id="demo.ApplicationRibbon.Button2.Button.LabelText"><Titles><Title description="3" languagecode="1033" /></Titles></LocLabel><LocLabel Id="demo.ApplicationRibbon.Button8.Button.LabelText"><Titles><Title description="2" languagecode="1033" /></Titles></LocLabel><LocLabel Id="demo.ApplicationRibbon.Button12.Button.LabelText"><Titles><Title description="4" languagecode="1033" /></Titles></LocLabel><LocLabel Id="demo.Homepage.applicationribbon.tab26.Group0.Title"><Titles><Title description="Group 1" languagecode="1033" /></Titles></LocLabel><LocLabel Id="demo.ApplicationRibbon.Button3.Button.LabelText"><Titles><Title description="5" languagecode="1033" /></Titles></LocLabel><LocLabel Id="demo.ApplicationRibbon.Button4.Button.LabelText"><Titles><Title description="7" languagecode="1033" /></Titles></LocLabel><LocLabel Id="demo.ApplicationRibbon.Button7.Button.LabelText"><Titles><Title description="6" languagecode="1033" /></Titles></LocLabel><LocLabel Id="demo.ApplicationRibbon.Button11.Button.LabelText"><Titles><Title description="8" languagecode="1033" /></Titles></LocLabel><LocLabel Id="demo.Homepage.applicationribbon.tab26.Group1.Title"><Titles><Title description="Group 2" languagecode="1033" /></Titles></LocLabel><LocLabel Id="demo.ApplicationRibbon.Button5.Button.LabelText"><Titles><Title description="9" languagecode="1033" /></Titles></LocLabel><LocLabel Id="demo.ApplicationRibbon.Button6.Button.LabelText"><Titles><Title description="12" languagecode="1033" /></Titles></LocLabel><LocLabel Id="demo.ApplicationRibbon.Button9.Button.LabelText"><Titles><Title description="10" languagecode="1033" /></Titles></LocLabel><LocLabel Id="demo.ApplicationRibbon.Button10.Button.LabelText"><Titles><Title description="13" languagecode="1033" /></Titles></LocLabel><LocLabel Id="demo.Homepage.applicationribbon.tab26.Group2.Title"><Titles><Title description="Group 3" languagecode="1033" /></Titles></LocLabel><LocLabel Id="demo.Homepage.applicationribbon.tab26.Title"><Titles><Title description="New Tab" languagecode="1033" /></Titles></LocLabel></LocLabels></RibbonDiffXml>

    I've attempted here to shown that it's really easy to create custom tabs groups with the Ribbon Workbench, quickly change the Template for each Group and then add Tab Scale Items to control the scaling behaviour. I think the most important point is that development time is greatly reduced because you can play with how the ribbon will scale without waiting for customisations to be uploaded and published first.

    The Ribbon Workbench for CRM 2011 is a free download.

    If you find an issue with the Ribbon Workbench for Dynamics CRM 2011 or have any suggestions, please send it here.

    Happy Ribbon Customising!

    Make sure ribbon buttons appear in Outlook

    $
    0
    0

    There are some marked differences in the way that the Ribbon is handled between Outlook and the Web Client of Dynamics CRM.

    Mandatory DisplayRule and EnableRule

    In the Web Client you can create buttons that refer to a command with just an action. If you want to make the button appear in Outlook, you need to have both a display rule and en enable rule.

    If you don't add at least one of each, you will not see your button because Outlook is failing to evaluate the rules. To see the reason why buttons are not showing up, you need to turn on Developer Debug messages in Outlook :

    (Options->Advanced->Show add-in user interface errors)

    Restart outlook and you will get the following error message:

    An exception occurred while calling function "HrExplorerServerButtonGetVisible"

    To correct this, using the Ribbon Workbench, the minimum you should have is a Display Rule and an Enable Rule both added to your Command. Each rule should have an OrEnableRule that detects either the Web or Outlook Client.

    This gives the following Ribbon Xml:

    <CommandDefinitions><CommandDefinition Id="new.ApplicationRibbon.Command0.Command"><EnableRules><EnableRule Id="new.ApplicationRibbon.EnableRule0.EnableRule" /></EnableRules><DisplayRules><DisplayRule Id="new.ApplicationRibbon.DisplayRule0.DisplayRule" /></DisplayRules><Actions><Url Address="about:blank" WinMode="0" /></Actions></CommandDefinition></CommandDefinitions><RuleDefinitions><TabDisplayRules /><DisplayRules><DisplayRule Id="new.ApplicationRibbon.DisplayRule0.DisplayRule"><OrRule><Or><CrmClientTypeRule Type="Outlook" /></Or><Or><CrmClientTypeRule Type="Web" /></Or></OrRule></DisplayRule></DisplayRules><EnableRules><EnableRule Id="new.ApplicationRibbon.EnableRule0.EnableRule"><OrRule><Or><CrmClientTypeRule Type="Web" /></Or><Or><CrmClientTypeRule Type="Outlook" /></Or></OrRule></EnableRule></EnableRules></RuleDefinitions>

    Actually it doesn't matter what rules you use, provided there is at least one and it evaluates as true for both Outlook and the Web Client.

    Unique ID's

    In the Web Client, each Homepage ribbon is loaded on the fly within a browser window. In Outlook, all of these ribbons are loaded on start up. If you don't have unique identifiers for all CustomActions and Buttons, you will receive the error:

    Error Found in Custom UI XML of "Microsoft Dynamics CRM""The ID CrmOrg.<GUID>.<Button ID>' is duplicated"

    This issue was originally described by http://blog.sonomapartners.com/2011/08/ribbon-errors-in-outlook-add-in-for-dynamics-crm-2011.html

    The most recent version of the Ribbon Workbench for Dynamics CRM 2011, ensures that when you add a button to a group on a tab that is duplicated for more than one entity (i.e. The Application Ribbon tabs), it add '{!EntityLogicalName}' into the ID, so that no two ID will be the same.

    E.g.

    <CustomAction Id="new.ApplicationRibbon.{!EntityLogicalName}.Button12.Button.CustomAction" Location="Mscrm.HomepageGrid.{!EntityLogicalName}.MainTab.Management.Controls._children" Sequence="45"><CommandUIDefinition><Button Id="new.ApplicationRibbon.{!EntityLogicalName}.Button12.Button" LabelText="$LocLabels:new.ApplicationRibbon.Button12.Button.LabelText" Sequence="45" TemplateAlias="o2" /></CommandUIDefinition></CustomAction>

    Thanks to Peter Hörnell for his help with this one.

    Rename a standard CRM2011 Tab

    $
    0
    0

    Occasionally the built-in names for Ribbon tabs need to be changed. Using the Ribbon Workbench for CRM2011 makes this very easy.

    1. Create a solution with the entity you want to change.

    2. Open the Ribbon Workbench for CRM2011 and select your solution.

    3. Find the tab you want to change. If you want to customise the Form Tabs, you'll need to select the 'Form' value in the drop down in the top right.

    If you wanted to change the 'Add' tab on the Account form, you would add the 'Account' entity to the solution, and select the 'Form' tab in the workbench:

    4. Select the 'Add' tab and use the 'right click' menu to 'Customise Tab'. This will mark each element within the tab as customised so you are free to rename/edit/add to.


    5. Select the 'Add' tab and in the right hand properties, rename the TabTitle to whatever you want:

    6. Click Publish Solution, and you will then see your tab renamed:

    The Ribbon Workbench for CRM 2011 is a free download.

    If you find an issue with the Ribbon Workbench for Dynamics CRM 2011 or have any suggestions,please send it here.

    Happy Ribbon Customising!


    Moving towards Version 1.0

    $
    0
    0

    Thank you to all of you who have helped with moving Ribbon Workbench further towards version 1. There has been some great feedback and many of you have helped by testing fixes before a new version was released.

    Over the next few weeks I'll be adding more chapters to the help found at :

    http://ribbonworkbench.uservoice.com/knowledgebase

    If there any specific customisations scenarios that you would like to be covered, please let me know.

    If you've not already checked it out, download the Ribbon Workbench for CRM 2011 for free.


    How to move a button from one Ribbon tab to another

    O Ribbon, Ribbon! wherefore art thou Ribbon?

    $
    0
    0

    Recently, I had to trouble shoot an issue where the Ribbon was not being displayed for a particular entity. When navigating away from the form, the following error was given by CRM 2011:

    <CrmScriptErrorReport><ReportVersion>1.0</ReportVersion><ScriptErrorDetails><Message>Unable to get value of the property 'attrs': object is null or undefined</Message><Line>1</Line><URL>/_static/_controls/ribbon/ribbon.js?ver=-658901612</URL><PageURL>/main.aspx</PageURL><Function></Function><CallStack></CallStack></ScriptErrorDetails>

    It turns out that this was because of a FlyoutAnchor/SplitButton with no PopulateQueryCommand or Menu Sections added. 

    The most recent version of the Ribbon Workbench now has a validation rule that checks you have either of these before publishing.


    Enable/Disable a ribbon button dynamically based on a form value

    Ribbon Workbench demo at eXtremeCRM!

    $
    0
    0

    Yesterday, Jim Daly demoed the Ribbon Workbench in his session on 'Dynamics CRM Extensibility:  Tools, Resources, and What’s New' at eXtremeCRM in Las Vagas. Coincidently, last week the Ribbon Workbench moved out of beta testing.

    I'm really pleased with how the Ribbon Workbench has turned out - and a BIG THANK YOU to all those who have helped.

    The coming months will see new features being introduced into version 2 - be sure to watch out for an up coming post with the road-map for the Ribbon Workbench.


    No-Code Workflow Shortcut Ribbon Button

    Add a Run Dialog Short-Cut Ribbon Button

    Adding Auto Refresh to Dashboards

    $
    0
    0

    This post shows you how to set up a CRM2011 Dashboard 'auto-refresh' feature using the Ribbon Workbench in 10 easy steps (well…11 if you count clicking publish at the end!).

    We will add an auto refresh function to the 'EnableRule' of the Dashboard refresh button that schedules a refresh using the 'setTimeout' function. The EnableRule is called when the dashboard page is first displayed to check if the Refresh Button should be enabled. We schedule the refresh, and then return true to ensure the button is still enabled. This technique can also be used to add JavaScript to areas of CRM 2011 that are not form based.

    Let's get started:

    1) Create a new solution and add the Application Ribbon to it (Client Extensions->Add Existing->Application Ribbon).

    2) Create a new web-resource named 'RefreshRibbon.js' (or something similar)

    Add the following JavaScript to it:

    var AUTO_REFRESH_INTERVAL=30000;
    /// Schedule the first refresh if we havn't already
    function autoRefreshDashboards() {
        var topWindow = window.top;
        if (typeof (topWindow['refreshRegistered']) === 'undefined') {
            window.setTimeout(autoRefreshTimeoutCallback, AUTO_REFRESH_INTERVAL);
            topWindow['refreshRegistered'] = true;
        }
        return true;
    }
    // Refresh the dashboards and schedule the next refresh
    function autoRefreshTimeoutCallback() {
        try {
            Mscrm.DashboardRibbonActions.refreshDashboardPage();
            window.setTimeout(autoRefreshTimeoutCallback, 30000);
        }
        catch ($e1) {
            // Perhaps the dashboards are no longer loaded. and we are on a different page
        }
    }

    Note: You can change the refresh interval using the 'AUTO_REFRESH_INTERVAL' value which is in milliseconds (30000=30 seconds)

    Your solutions should now look something like:

  1. 3) Open the Ribbon workbench, and load up your new solution.

    4) Select the 'Application Ribbon' in the 'Entities' panel if not already, then select the 'Dashboards' tab in the Design surface (be sure to select 'Dashboards' and not 'Dashboard')

    5) Right click on the 'Refresh All' button and click 'Customise Command' (Not Customise Button)

  2. 6) Locate the 'Mscrm.DashboardTools.RefreshCommand' command in the 'Commands' section of the 'Solution Elements' panel. Right click, and select 'Edit Enable Rules'

    7) In the Enable Rules dialog click '+Add New' and then select 'Add Step', before selecting 'Custom JavaScript Rule'

    8) In the Enable Rule properties, set:

    FunctionName: 'autoRefreshDashboards'

    Library : Click the lookup button and select the 'RefreshRibbon.js' (If you don't see it, then you forgot to add the javascript webresource you created above to the solution you loaded into the Ribbon Workbench)

    9) Click OK, and OK again.

    10) In the 'Solution Elements' panel, expand the 'Enable Rules' and select 'Mscrm.IsDashboardSelected'. In the properties panel, set 'IsCore' = True.

    This ensures that this rule is not customised in our solution since we only need to customise the Command to add the new enable rule.

    11) Click Publish Solution

    And you're done! This will work both in the Web Browser and the Outlook client. It is important that you remember that auto-refreshing dashboards could place more load on your server if lots of users leave the dashboards open all day!

    Until next time…

    @ScottDurow


    App/Command Bar Workbench for Dynamics CRM 2013

    $
    0
    0

    The present roadmap for Dynamics CRM has the next version (Dynamics CRM 2013 possibly) sporting the new 'modern' UI throughout. An automatic upgrade path from Dynamics CRM 2011 forms customisations and ribbons will be provided - and it's likely to use a similar RibbonXml like schema under the hood. With this in mind I've done some re-imagining of what the Ribbon Workbench might look like by the end of the year.

    Introducing the App Bar Workbench for Dynamics CRM 2013

  3.  

    Exciting times are ahead :)

    @ScottDurow

    Evolution of the Dynamics CRM Toolbar

    $
    0
    0

    With the first glimpses of Orion being available (or Dynamics CRM 2013 as it is now called) I thought it would be a good time to look back at how the form tool bar has evolved over its history.

    I've been working with Dynamics CRM ever since the first version (when it was just Microsoft CRM) and with great fondness I reminisce!

    Microsoft CRM 1.0 (Released January 2003)
    Microsoft CRM 1.2 (Released December 2003)

    The tool bar was very much as you would expect for any application of this era. Drop down menus and 16x16 icons with optional text descriptions.

    Microsoft Dynamics CRM 3.0 (Released December 2005)

    The toolbar remained very similar to the previous version, but with some groovy shading to give it a fresher look and align with the Microsoft Office toolbar style. Now part of the Dynamics family, this alignment with Microsoft office was an important step change in the product. As the window was shrunk in width, the text labels would disappear leaving only the icons to save space.

    Microsoft Dynamics CRM 4 (Released December 2007)

    The toolbar was again updated with the Microsoft Office style – and the dropdown menus were replaced with the Jewel menu. I remember many people using Dynamics CRM for many months before realising that you could click on the Jewel to get the 'File' drop down! Dropdown buttons were also introduced (e.g. Actions) to combine the dropdown menu bar with the button bar.

    Microsoft Dynamics CRM 2011 (Released February 2011)

    The Office Ribbon had been big news already, but its introduction into Dynamics CRM was again a step to align it with Microsoft Office. This was especially important for the Microsoft Outlook integration to give a consistent user experience. In Dynamics CRM, the ribbon introduced different sized buttons depending on significance, rows of buttons, split buttons and dynamic resizing based on the width available. RibbonXml provided a rich and powerful way of adding custom buttons that critically could be context sensitive so that they would dynamically show/hide, enable/display depending on what was selected or the data on a form. This was fantastic for XRM (Anything Relationship Management) applications but it was error prone to create due to the complexity of RibbonXml. The Ribbon Workbench plugged this gap!

    CRM 2011 POLARIS/UR12

    With the release of the Polaris/UR12 update, a new style of user interface was introduced that was used on an opt-in basis. The UI was based around the new Modern 'flat' user interface that originated from Microsoft Zune, further developed by Windows Phone and later Windows 8. If the 'process' UI was selected, the ribbon was replaced by a simple toolbar that addressed the main criticism of the Ribbon in that it was 'too complicated'. The design principle of 'the content is the UI' aimed to reduce chrome and use simple typography in order to increase readability and usability. An interesting result of this simplification is the reduction to a maximum of 7 buttons on the toolbar before others are pushed into the ellipses drop down.

    The main drawback with the Polaris process forms was that they were not customisable and so remained to many customers more of a 'preview' of things to come.

    ORION/Microsoft Dynamics CRM 2013 (Release Fall 2013?)

    … and so that brings us to Dynamics CRM 2013 which at the time of writing is due for release in October 2013.
    It has been well publicised that the Ribbon will no longer feature in Orion in favour of the new Modern 'flat' user interface style, and indeed the style is very similar to Polaris but with coloured buttons and the return of the well-loved 'Save & New' button. I welcome the addition of colour as I often found the grey buttons hard to locate quickly on the form. The design principle of keeping the number of buttons to a minimum still applies and the ellipses overflow dropdown is still there. It has been confirmed that the RibbonXml will still be used to customise this toolbar/command bar – and I suspect that those icons are the same 16x16 ones we see in the CRM2011 ribbon. Naturally, a new version of the Ribbon Workbench will be released for Dynamics CRM 2013.

    Thanks for indulging me and reading this far - I'm feeling a bit glassy eyed and nostalgic - but the question still remains – what do we call the new ribbon?
    Toolbar? App Bar? Command Bar?

    I'll keep you posted when I find out!

    @ScottDurow
    Check out my Rockstar365 profile!

    Ribbon ‘XML’ Workbench for Dynamics CRM 2013 with a silent ‘XML’!

    $
    0
    0

    After much deliberation and consultation, I have decided to stick with the name 'Ribbon Workbench' rather than rename to CommandBar Workbench. Here are some of the reasons behind this decision:

    1. The Command Bar in CRM 2013 is still defined with RibbonXml, but rendered differently. A DisplayRule is used to exclude buttons from the CommandBar.
    2. The Ribbon is still present on non-refresh entities and in Outlook so it's important to still have support for Ribbon editing.
    3. Since the Ribbon Xml remains unchanged, it's important to understand and differentiate between Tabs/Groups and Layouts.
    4. The Ribbon Workbench is already an established 'brand' than people know about.
    5. So until we have CommandBar XML in a future version of Dynamics CRM – it'll always be the Ribbon 'XML' Workbench with a *silent* 'XML'!

    The new version has the following improvements:

    • Dynamic switching between the Command Bar and Ribbon view
    • UI refreshed to match Dynamics CRM 2013
    • Performance Optimisations
    • Support for new Dynamics CRM 2013 schema
  4. For those of you with access to the Dynamics CRM 2013 beta - the Ribbon Workbench for Dynamics CRM 2013 beta is available for download here:
    http://www.develop1.net/public/page/Ribbon-Workbench-for-Dynamics-CRM-2011.aspx

    @ScottDurow

    How to restore a hidden button on the CRM 2013 Command Bar

    $
    0
    0

    The new Dynamics CRM 2013’s command bar has deliberatly limited space for buttons due to the ‘intentionally constrained’ user interface design. The idea being that if you limit the space for buttons, then designers will be forced to only show those that are absolutely necessary and the user experience will be improved. As result, many of the buttons from the CRM 2011 Ribbon Bar have been removed from the CRM 2013 Command Bar.

    The CRM2011 Ribbon Buttons are still there, but hidden using a new RibbonXml Display Rule named 'Mscrm.HideOnCommandBar'. This article shows you how to restore those buttons to the Command Bar that your users absolutely must have using the Ribbon Workbench for CRM2013.

    1. Create a solution containing the entities that you wish to restore buttons for. This example uses the ‘Case’ entity, and we are restoring the ‘Connect’ button on the ‘Form’ command bar.
    Before customising, the Form Command Bar looks like the following:

    You’ll notice that only 5 buttons are shown until buttons are added to the ‘overflow’ menu. The ‘Connect’ button is not here since it was deemed unessential.

    2. Open the solution containing the Case entity in the Ribbon Workbench for CRM 2013 and select the ‘incident’ entity if not already selected. You will see by default the Command Bar is selected.
     

    3. In order to locate the button we want to restore, click on the ‘Ribbon’ selector to show the Ribbon. This will show the Ribbon Design surface.

    4. Select the ‘Form’ ribbon using the dropdown on the top right of the design surface, then select the ‘Connect’ button and Right-Click ‘Customize Command’

    5. Locate the Customised Command in the ‘Solution Elements’ tab under ‘Commands’

    6.  In the Edit Display Rules dialog, select the ‘Mscrm.HideOnCommandBar’ rule and click the ‘<Remove’ button.

    7.  Important: Locate the following Display Rules, and set the ‘IsCore’ property to ‘True’– this will prevent them from being customised as well:

    a.      Mscrm.HideOnCommandBar

    b.      Mscrm.CreateConnection

    c.      Mscrm.IsConnectionsEnabledPrimary

    d.      Mscrm.HideOnModern

    8. Important: Locate the ‘Mscrm.FormStateExistingOrReadOnlyOrDisabled’ Enable Rule, and set the ‘IsCore’ property to ‘True’

    9. Click ‘Publish’

    10 Now when you refresh the Case Form, you will see the Connect button again.

    11  You’ll notice that only the default button is shown – so if you use the drop down, you’ll only get the ‘Connect to Another’ option. To enable the ‘To Me’ button repeat the process for the ‘To Me’ button:

    Remember to make sure that only the buttons that are really needed are included - the Command Bar has been constrained intentially to give your users the best experience.

    @ScottDurow


    Upgraded to Orion? Upgrade to Ribbon Workbench for CRM2013

    $
    0
    0

    If your Dynamics CRM Online instance has been upgraded to Orion (CRM2013) you will need to upgrade to the latest version of the Ribbon Workbench for CRM2013. Since the Ribbon Xml Schema has changed slightly with CRM2013, the old version will no longer work.

    Upgrade Steps:

    1. Open Settings->Solutions.
    2. Locate the Ribbon Workbench solution and click 'Delete'
    3. Download and Import the Ribbon Workbench for CRM2013.
    4. Refresh your browser and navigate to Settings->Solutions where you will find the new Command Bar button:

    Further reading:

    1. Ribbon 'XML' Workbench for Dynamics CRM 2013 with a silent 'XML'!
    2. 4 things you need to know about the Command Bar
    3. Restore a Button that has been removed from the CRM 2013 Command Bar


    Viewing all 31 articles
    Browse latest View live